Customize Transaction Grid: Add a new column to the transaction grid in the POS screen.
Sometimes we want to add an additional column or field to the transaction screen as a D365 Retail POS (Point of Sale) developer.

Solution!
- in F&O (Finance and Operations), go to Retail and Commerce > Channel setup > POS setup > POS > Screen layouts
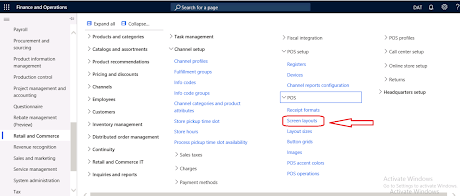
- Select the screen layout ID which is associated with your POS. Click on the Setting icon in Top right corner and check your layout id and layout Resolution. Click the Layout Designer button in the action bar.

- In the designer, right-click the transaction grid (receipt grid) and select Customize.

- In the Customization – Receipt window, select the lines in the pivot panel drop-down menu.


Similarly, you can add a custom column to the Payment and Delivery tab.
Add business logic to a custom column
Open Visual Studio in administrator mode.
Open the CloudPOS solution from …\RetailSDK\POS.
Under the POS.Extensions project create a new folder named CustomColumnExtensions.
Under CustomColumnExtensions, create a new folder named Cart.
Under Cart, create a new folder named LinesGrid.
In the LinesGrid folder, add a new Typescript file and name it CustomColumn1Configuration.ts.
Add the following import statements to import the relevant entities and context
CustomColumn1Configuration.ts File
import {
ICustomLinesGridColumnContext,
CustomLinesGridColumnBase
} from "PosApi/Extend/Views/CartView";
import { CustomGridColumnAlignment } from "PosApi/Extend/Views/CustomGridColumns";
import { ProxyEntities } from "PosApi/Entities";
export default class LinesCustomGridColumn1 extends CustomLinesGridColumnBase {
constructor(context: ICustomLinesGridColumnContext) {
super(context);
}
public title(): string {
return "WareHouse"; // name of new column
}
public computeValue(cartLine: ProxyEntities.CartLine): string {
return cartLine.WarehouseId.toString(); // value for new colimn, you can select value based on your requirement
}
public alignment(): CustomGridColumnAlignment { // Alignment
return CustomGridColumnAlignment.Right;
}
}
8. Create a new .json file under the CustomColumnExtensions folder and name it manifest.json.
9. In the manifest.json file, replace the generated code with the following code.
{
"$schema": "../manifestSchema.json",
"name": "Customize Transaction Grid",
"publisher": "XYZ",
"version": "7.2.0",
"minimumPosVersion": "7.2.0.0",
"components":
{
"extend": {
"views": {
"CartView": {
"linesGrid": {
"customColumn1: // customColumn1 is the column which we added in the designer layout
{
"modulePath": "Cart/LinesGrid/CustomColumn1Configuration"
}
}
}
}
}
}
}
10. Open the extensions.json file under the POS.Extensions project and update it with the
CustomColumnExtensions sample, so that POS during runtime will include this
extension.
{
"extensionPackages": [
{
"baseUrl": "CustomColumnExtensions"
}
]
}
11. Compile and rebuild and deploy the project

Comments
Post a Comment